How to use ACE in Angular

What is ACE?

As the homepage of ACE prompts, Ace is an embeddable code editor written in JavaScript. It matches the features and performance of native editors such as Sublime, Vim and TextMate. It can be easily embedded in any web page and JavaScript application. You can download and try at https://ace.c9.io/

How to use ACE editor in your Angular app

There are many ways that you can use ACE editor in your Angular app. You can directly download ACE and plug into your project or find a popular built-in angular module

I refer the second one because we shouldn’t reinvent the wheel and the popular built-in one should be used by many developers. So that, bugs must be fixed and the performance must be nice.

ng2-ace-editor is a good one. You can find this package from npm website

https://www.npmjs.com/package/ng2-ace-editor

From root folder of your project where the package.json is in

npm i ng2-ace-editor --save

In your module, import this editor module by add AceEditorModule in to imports section on @NgModule decorator

import { AceEditorModule } from 'ng2-ace-editor';
@NgModule({

    declarations: [

        ...

    ],

    imports: [

         ...

        AceEditorModule,

        ....

       )],

    providers: [],

    bootstrap: []

})

export class AppModule { }
The you can now use ace-editor component in your template file
<ace-editor theme="monokai" mode="javascript" style=" min-height: 150px; overflow: auto;" [formControlName]="'answer'+(num+1)"></ace-editor>
You may see the errors as below one after another. Your editor cannot work correctly
index.js:3802 GET http://localhost:4200/mode-javascript.js net::ERR_ABORTED 404 (Not Found)
After you try to fix the above then you get the followings
blob:http://localhost:4200/5522acb5-d008-4704-b802-99d0412dab23:1 Uncaught DOMException: Failed to execute 'importScripts' on 'WorkerGlobalScope': The script at 'http://localhost:4200/worker-javascript.js' failed to load.
at blob:http://localhost:4200/5522acb5-d008-4704-b802-99d0412dab23:1:1
(anonymous) @ blob:http://localhost:4200/5522acb5-d008-4704-b802-99d0412dab23:1
blob:http://localhost:4200/0741dc5a-f771-4b66-91e1-751e6f50f0b2:1 Uncaught DOMException: Failed to execute 'importScripts' on 'WorkerGlobalScope': The script at 'http://localhost:4200/worker-javascript.js' failed to load.
at blob:http://localhost:4200/0741dc5a-f771-4b66-91e1-751e6f50f0b2:1:1
(anonymous) @ blob:http://localhost:4200/0741dc5a-f771-4b66-91e1-751e6f50f0b2:1
blob:http://localhost:4200/bc6ee16c-f739-4a14-90ca-c0745b80ff61:1 Uncaught DOMException: Failed to execute 'importScripts' on 'WorkerGlobalScope': The script at 'http://localhost:4200/worker-javascript.js' failed to load.
at blob:http://localhost:4200/bc6ee16c-f739-4a14-90ca-c0745b80ff61:1:1
You have to add scripts and assests in angular.json to tell webpack to include those kind of resources to get ACE working with Angular
Add the following into your angular.json then try to ng serve again
"assets": [
"src/favicon.ico",
"src/assets",
{ "glob": "worker-javascript.js", "input": "./d /ace-builds/src-min/", "output": "/" },
{ "glob": "worker-css.js", "input": "./node_modules/ace-builds/src-min/", "output": "/" },
{ "glob": "worker-json.js", "input": "./node_modules/ace-builds/src-min/", "output": "/" }
],

"scripts": [
"./node_modules/ace-builds/src-min/ace.js",
"./node_modules/ace-builds/src-min/mode-javascript.js"
]
},

It would be working now! Hope it helps.
How to use ACE in Angular

Google cloud function: express-session generate new session id every request

My application is using ReactJs for frontend and NodeJs + Express for backend API. Everything seem to be fine until I use express-session for application session.

Google Cloud Function is a very good cloud based service for hosting. You can easily deploy your NodeJs app into this platform. But when it is used along with express-session there is a problem. When client send a request to server, the response is returned flawlessly but session id cannot be saved into client cookie. Therefore, all later requests the server treats as from new session.

I was spending hours to find out the solution for this. Some say that when you initialize the session in express app, you have to set cookie secure option to false for non-https. Or in the client side, for every request you have to set credential = “include” option for whatever Ajax calls using ES6 fetch or Axios. Unfortunately all tries with those ways would not be working.

Pasted_Image_9_17_18__5_52_PM.png

Pasted_Image_9_17_18__3_24_PM.png


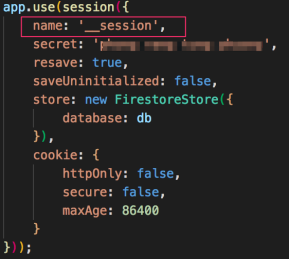
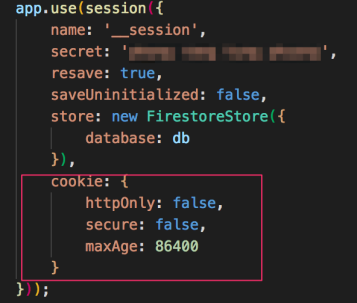
By the design of Google Cloud Function, __session is the only cookie that you can store. This is necessary for them to be able to efficiently cache content on the CDN. And you have to set Cache-Control Header as private, this is also important.

So in the express application, you many create a session config with the name ‘__session’ as below to get it work

Pasted_Image_9_17_18__1_21_PM.png

Don’t forget to set Cache-Control Header as private

Pasted_Image_9_17_18__1_23_PM.png

So after your first request to server, a cookie for session id with name ‘__session‘ should be stored in your browser cookie.

Pasted_Image_9_17_18__1_32_PM.png

Your cookie for the session is stored correctly on your browser. Now you have to set proper credential option in your request to get the cookie information sent with the request to server side.

You can learn more about request credentials here

All done, your session is now maintained in the server.

Google cloud function: express-session generate new session id every request

Upgrade PHP version for Apache on Ubuntu server

One day, you found that your PHP version is too old and vulnerable. You have to upgrade to latest PHP version to avoid being exploited. You can follow the instructions below. Just a few commands.

Configure apache point to new version of PHP

**Important note**: List all your loaded modules in your old php by checking your phpinfo. The configure the same into new php in order to make sure your application have all needed modules for use.

a2dismod [current_php] ==> dis-mode current php version

root@ip-xxx-xx-x-xxx:/xxx/xxx/www# a2dismod php5 

perl: warning: Setting locale failed.

perl: warning: Please check that your locale settings:

 LANGUAGE = (unset),

 LC_ALL = (unset),

 LC_CTYPE = "UTF-8",

 LANG = "en_US.UTF-8"

    are supported and installed on your system.

perl: warning: Falling back to the standard locale ("C").

Module php5 disabled.

To activate the new configuration, you need to run:

  service apache2 restart

a2enmod [new_php] ==> en-mode to new php version

root@ip-xxx-xx-x-xxx:/xxxx/xxxx/www# a2enmod php5.6 

perl: warning: Setting locale failed.

perl: warning: Please check that your locale settings:

 LANGUAGE = (unset),

 LC_ALL = (unset),

 LC_CTYPE = "UTF-8",

 LANG = "en_US.UTF-8"

    are supported and installed on your system.

perl: warning: Falling back to the standard locale ("C").

Considering dependency mpm_prefork for php5.6:

Considering conflict mpm_event for mpm_prefork:

Considering conflict mpm_worker for mpm_prefork:

Considering conflict mpm_itk for mpm_prefork:

Module mpm_prefork already enabled

Considering conflict php5 for php5.6:

Enabling module php5.6.

To activate the new configuration, you need to run:

  service apache2 restart

You have to restart your apache to take effect.

root@ip-xxx-xx-x-xxx:/xxxx/xxxx/www#  service apache2 restart

 * Restarting web server apache2 

You can now check your phpinfo to see the new php version and loaded modules

Configure console PHP to new version of PHP for your cronjob or cli program

root@ip-xxx-xx-x-xxx:/xxxx/xxxx/www# ln -sf /usr/bin/php[version] /etc/alternatives/php

You can use ‘which’ php command to see what is your current php command point to

That’s all. Hope it help.

Upgrade PHP version for Apache on Ubuntu server

How to fix PHP Composer Update “cannot allocate memory” error

You develop your PHP application on your local machine and everything works perfectly. Then you want to release for the public use. You purchase a VPS then install related services, start a web server, git pull your code into, finally run composer update…and whoops an error of memory is printed out your console.

Pasted_Image_3_29_18__3_07_PM

This is because your VPS is too small or by any certain reasons that your VPS swap memory is out. There is 2 ways to tackle this issue.

  • Upgrade your VPS or purchase a new one that have enough RAM for swap.
  • Hack your swap memory inside your old VPS with no bucks cost.

The second options may sound more sense right, let’s do it. It’s easy 🙂

The following will help you to hack on your VPS swap memory

1. Initialize your swap.1 file with size of 1Gb
root@ip-xxx-xx-6-164:/# sudo /bin/dd if=/dev/zero of=/var/swap.1 bs=1M count=1024

You will see the result
1024+0 records in
1024+0 records out
1073741824 bytes (1.1 GB) copied, 13.6493 s, 78.7 MB/s

2. Make your swap on swap.1 file
root@ip-xxx-xx-6-164:/# sudo /sbin/mkswap /var/swap.1

You will see the result
Setting up swapspace version 1, size = 1048572 KiB
no label, UUID=be28fbf5-51ce-49bd-b46d-6b45770a6624

3. Activate your swap
root@ip-xxx-xx-6-164:/# sudo /sbin/swapon /var/swap.1

That’s all. Run your compose update again.

How to fix PHP Composer Update “cannot allocate memory” error

Case Study – Profit $5000 with 2 Niches Teespring – Part 1


Part 1: First NICHE

Yarn –  Knitting – Yarn LOVER

In US people have many weird interests, especially many love something in a way that is unable to understand. They never leave their loved things at home, then even seems not to live without them. Yarn is an example.

1. Before setting up a campaign

This campaign is one among my very first successful Teespring campaigns. I setup this campaign when I was a newbie on Teespring and thought that not easy to sell. So in-confidence or worry are things that easily to be in your head. Don’t mind to much. Travelling forms a young man.

2. Niche and idea

For stuffs related to design, I have my own designer. You should invest time and money on the cool design because this is one of the most vital factor that plays a decisive role in your sale

3. Facebook Ads – Target audience :


My Yarn Knitting T-shirt is now ready, I launch a Teespring campaign and post into Fanpage. This campaign I relaunch 4 times, the first time was in last year when I was new on Teespring, when the campaign ended, I found that it is possible to re-sell, I relaunch second time with less success than the first, third time I deleted the post with 20k likes, thousand of shares and comment. I keep only the last launch post with 6k likes.

In order to target the right audience for this campaign, I used google to break down and analyse my niche. This niche is about Yarn, knitting and when I searched on google for interests, fields that related to this niche I found: textiles, sewing, crocheting, weaving, Embroidery etc. So I decided to use Narrow Audience on Facebook Ads to intersect these interests.

I applied those things into my campaign as the below:


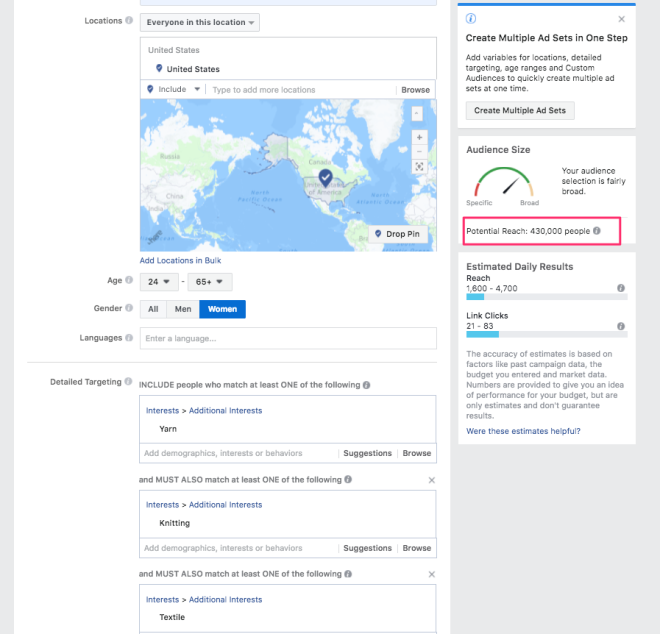
Country is United States obviously and the age range (in test period) from 24 – 65+. Ads display options is in Newfeed Desktop and Mobile Desktop. Gender is female, as I have an analytics on Audience Insight and found that only the female loves Yarn stuffs so that why I only target my ads on female.

4. ads Optimization

On the first day, I set the budget 5$/day with 2 sales (profit more than 20$), ROI is quite high so I split the Ads with 430k audience into small ad sets by ages and got good results.

I utilized Conversion Tracking in order to know sale come from which ad set then I remove low performance ad set. Gradually I got the good ad sets and the only thing need to do now is to increase the budget to let ad reach all potential Audience. The increase on budget I did 5$ => 7.5$ => 10$ => 12.5$ etc do not set budget too high at once.

When I created the campaign, I didnot forget to create Custom Audience Website Traffic for Retargeting maybe many of them click and view but don’t buy this time but they are interested on it obviously. Don’t forget to retarget the old audience, it is very helpful and probably bring you a big sale

By doing that, my first launch, first 7 days I got 71 sales, second launch 125 sales, third launch 52 sales then the last launch 72 sales, 320 in total


COST  : $1794

GROSS INCOME : $3783

PROFIT : $1989

5. lesson learned

  • There is many weird interests in United States, take advantages from them.
  • Try to design a good shirt, if you cannot do by yourself hire a good designer
  • Try to target as many as possible the potential audiences then filter list of high performance ad sets.
  • Ad optimization, retargeting in order to get sales from those who don’t buy in the first time

Hope this bring perks to you all, you can practice it yourself, find your niche and try.

Good luck.

Translated from https://kiemtiencenter.com/

Case Study – Profit $5000 with 2 Niches Teespring – Part 1

How to secure your Redis

A murky day

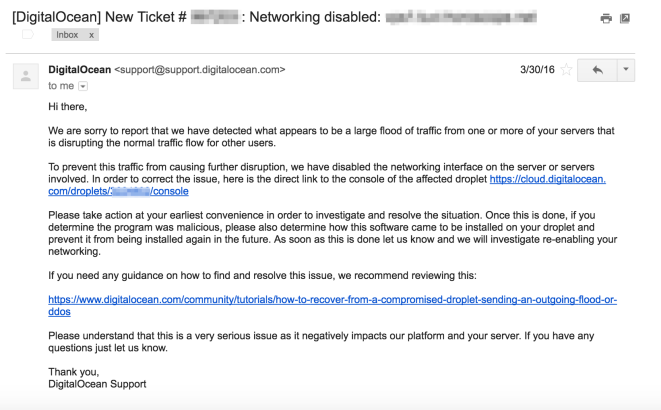
In a certain day, you receive an email from your Virtual Private Server (VPS) Provider to inform you that your VPS has been compromised. It is certain that your VPS public network will be disabled by the provider. Your sites or apps absolutely cannot be accessed. That is such a bad day.

If your VPS has Redis installed and exposed a port to public network, you will sooner or later receive an email like mine above. You must keep in mind that Redis is designed to be accessed by trusted clients inside trusted environments. This means that usually it is not a good idea to expose the Redis instance directly to the internet or, in general, to an environment where untrusted clients can directly access the Redis TCP port or UNIX socket. In general, Redis is not optimized for maximum security but for maximum performance and simplicity. You can read more about Redis on its official website.

How to secure your Redis

I am writing 5 steps that can help your Redis be secure.

Step 1: Securing the server with iptables

In the step you have to setup a firewall on your server. You can go to this tutorial on digital ocean to know what need to do for a firewall setup.

Once your firewall is ready, you can allow any IPs that you trusted can access to the server so that this can connect to Redis.

Step 2: Binding to localhost

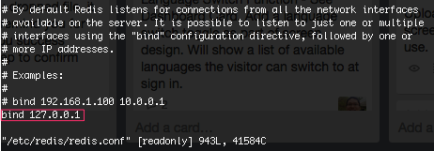
By default, Redis is only accessible from localhost. Make sure this line below exists on your redis configuration file.

$ vi /etc/redis/redis.conf

Make sure this line is uncommented (remove the # if it exists)

Step 3: Configuring a Redis password

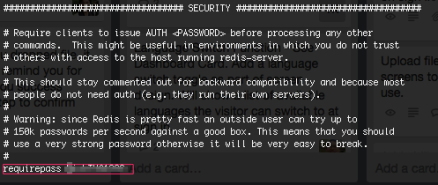
Edit your redis configuration file again /etc/redis/redis.conf. Generate your secure password and add into the config under the SECURITY section.

Once your password is setup, you will use AUTH command to make the authentication.

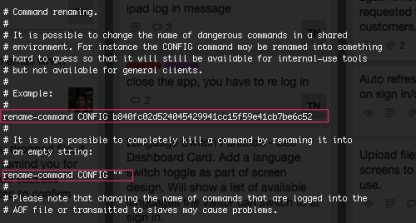
Step 4: Renaming dangerous command

The other security feature built into Redis allows you to rename or completely disable certain commands that are considered dangerous.

Like the binding or setting password into config, disabling or renaming was done by editing your Redis config file under the SECURITY section.

Step 5: Setting data directory ownership and file permission

You can easily check the redis folder permission as typing the command below:

$ ls -l /var/lib | grep redis
drwxr-xr-x 3 redis    redis      4096 Nov 22 03:28 redis

That’s not is the folder’s permissions, which is 755. To ensure that only the Redis user has access to the folder and its contents, change the permission to 700:

$ chmod 700 /var/lib/redis

The other permission you should change is that of the Redis configuration file. By default, it has a file permission of 644 and is owned by root, with secondary ownership by the root group:

$ ls -l /etc/redis/redis.conf
-rw-r--r-- 1 root root 30176 Jan 14 2017 /ect/redis/redis.conf

That permission (644) is world-readable, which is not a good idea. We need to change the ownership and permissions:

$ chown redis:root /etc/redis/redis.conf
$ chmod 600 /etc/redis/redis.conf

Finally, to get your changes effected, you need to restart your Redis:

$ service redis-server restart

Conclusion

No matter which purposes that you are using Redis, always keep in mind Redis is for trusted clients in a trusted environment only. Check your current Redis and follow the above steps for a better secure server.

How to secure your Redis

Last Saturday

“It is Friday”, I messaged to one of my best friend on Slack and also not forget to send him a funny Friday gif from Giphy. These days were very hot, you even get sweaty a lot when just going out at 8AM. Unlocking my phone, surfing new feeds on Facebook, I spontaneously remembered that tomorrow would be a very busy day of mine. In hurry, I set up the alarm at 5:15AM Saturday. “What a weekend!”, I let out a long sigh of depression.

I drove very fast to the center and had a quick parking. Getting out by small door in the end of the parking place, I saw my teacher waiting for me in his car. He is always sooner than me for any cases. It was 6:05 now, Saturday morning. We are going to the Training Court in Cu Chi. It would be a big sunny day certainly because the sky was very clear and inside the car I felt the heat surrounding me in that very early morning.

Time flied so fast, it was around 3 months from the first day of training for a B2 driving license. That Saturday was my full lesson review day for the examination on the week later. I had practiced every Saturday for 4 continuous weeks in District 2 for every parts of the final test. They are a driving on the straight road, a parking on the side road between 2 other cars (called parallel parking) and parking into U shape cage (called reverse parking) lesson. My teacher was very patient on me, he taught by his heart to transfer me the formula, rules and his special techniques as well on the most understandable way. One thing that he made me very impressive is while I was doing my practice he had a local woman cook for the lunch and he paid all for the meal. Without a doubt that he is not only a passionate teacher but also a true friend. The day seemed to be less hot than it would be in a particular way.

In my opinion, the attitude plays a very important role on studying the new things. For a driving license that is not an exception definitely. The better attitude that you have on study the better output respectively. I find myself have a very good attitude on this course. I did not miss any driving law classes and got most of practice days on time. I had a very great teacher. Moreover I have been learning by myself many driving techniques through the press, youtube and social media . I strongly believe that I will graduate the course very successfully. Yay!

This bird is very friendly at the training court

Bird’s response at driving training court

Last Saturday

2 family meeting

It is an early morning day of Lunar August 2016 when the moon got its full size. In the village, children insist their parents for candles and cakes to celebrate their little party at night. “It is adorable” I thought silently. My mom was sweeping the fallen leaves in the yard then gave the house a quick clean. I was flying into the thinking of many things happily and nervously. “Binh, how did you prepare the dress?”, my grandma said out loud from the sub-house suddenly. I woke up and said back “I have a short sleeve shirt and a new pair of dress pants”. “This shirt is not formal at all, borrow the white long sleeve one from uncle Diem, stuck in then go”, said her. “Wait, let me iron it first”, my mom’s voice from the yard right after her words.

Dressed on with a little perfume, had on hairs a bit gels, I found myself pretty enough. “Bring the mooncakes from the room”, said mom. “Yes” I responded. This is two literally but the more meaningful thing than the number was “couple”. “From now and later on, ah…wedding candles, wine, and any kind of gifts must be in couple. Done? Go quickly, don’t waste time, 2 hours to get there, be faster”, said my grandma.

Me, mom, uncle Diem and his wife, 4 peoples were on 2 motorbikes head to her house. It is about 60 kilometers with a ferry. I felt the air is very comfortable, the river is more peaceful than everyday…but actually deep inside of me I can’t hide my anxiety. “She is waiting for me”, thought me.

Her family welcomed us more warmly than ever. “Today, I have aunt 3 help me on cooking, she is very glad to hear you visit us”, her mother said happily. There is a well-prepared table with tea and cookies. “Take a seat everyone”, said someone. They together sat on very lightly. In the meanwhile I went into the kitchen to help bring dishes onto the table. There was a lot of dish and drinks, all are well-cooked and well-decorated. We would have the party here. Occasionally I looked towards the table. They had a very long talk quietly and formally.

The meeting that I had been participated is more formal than I think. My mom told in worry that “She abruptly stopped her smiling, her eyes became less happy than ever when I gave her the card. Please can tell me why it was not wrapped into a red envelope? – asked her”. “I think this is written into very tough card with pink background, I think it is formal enough. Is it alright?”. “It is okay, no problem, I just wondered that because this is not like the one in my district”. This is a letter of engagement and wedding date. In the tradition of South Vietnamese, we have a pre-wedding meeting called “Đám dạm ngõ” to inform that two families will prepare for the engagement and wedding celebration as the date that given in the letter. And the couples also have official dating later on.

Anyway, the meeting ended very successfully. Kids was playing out there with candles and cakes. “The moon is brighter and more attractive than ever tonight”, I looked very passionately. That was such a very long night…

2 family meeting

HOW TO INSTALL XHPROF FOR PROFILING PHP YII 1.X APPLICATION

  1. Introduction
    In software engineering, profiling is a technique used to analyze applications at run-time, in order to identify possible bottlenecks and performance issues within an application. It is an essential resource for software optimization. Profiling differs from benchmarking because it analyzes the application at code level, while benchmarking is intended to analyze the overall application performance as experienced by the end user.

    A profiler is a software that will gather detailed information about the application in order to generate statistics and insightful data about memory usage, frequency and duration of function calls, time to respond to a request, amongst other things.XHProf is a profiler designed to analyze PHP applications. Created and open sourced by Facebook, XHProf works as a passive profiler, which means it will work in the background while having minimum impact on the application’s performance, making it suitable to be used on production environments.
    (copy from digital ocean)

  2. How to install xhprof
    Update the package manager cache with

    sudo apt-get update

    Next, we’ll install pecl with the php-pear package. We’ll also need php5-dev in order to install PHP modules via pecl
    sudo apt-get install php-pear php5-dev

    Install xhprof via pecl

    sudo pecl install xhprof-beta

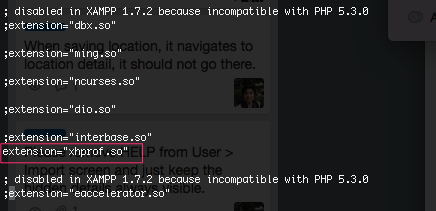
    Edit php.ini file to enable your xhprof extension. Look like the below,
    Pasted_Image_11_15_16__6_13_PM.png
    Restart your php daemon, open your phpinfo to make sure xhprof extension is loaded properly,
    Pasted_Image_11_15_16__6_17_PM.png

  3. How to configure in Yii 1.x application
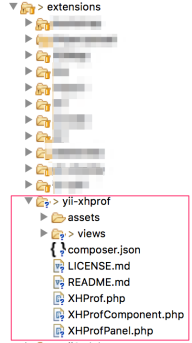
    Download Yii-xhprof and put into protected/extensions, you will see something like below,
    Pasted_Image_11_15_16__6_28_PM.png
    Make sure this config is in your application configuration,

    'preload' => array(
     'xhprof'
     ),

    and

     'components' => array(
        'xhprof' => array(
            'class' => 'ext.yii-xhprof.XHProfComponent',
            'libPath' => '/full/path/to/xhprof_lib',
            'htmlReportBaseUrl' => 'http://url.path.to/xhprof_html',
     ),),
  4. How to view the result
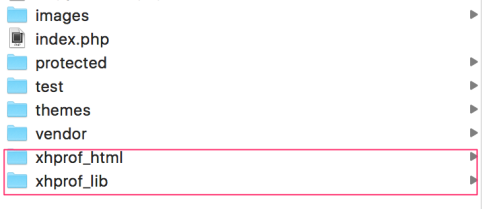
    Download PHP view and library package here, extract and copy these into your proper place, mine is in the root of application,
    Pasted_Image_11_15_16__10_07_PM.png
    In the xhprof configuration above, configure the libPath point to xhprof_lib folder
    Add virtual host point to xhprof_html in order to view the result. You can use apache or nginx,
    Yah, all will be done, you should see something like this
    Pasted_Image_11_15_16__10_20_PM.png
    You can click on Report link to see all the calls
  5. How to generate callgraph
    Click on Callgraph for visualization view, you can see all methods’ calls graphically like below
    Pasted_Image_11_16_16__9_28_PM.png
    Make sure graphziz is installed on your system, if not you may encounter this problem

    failed to execute cmd: " dot -Tpng". stderr: `sh: 1: dot: not found '

    Install graphziz as the command below

    sudo apt-get install graphviz
HOW TO INSTALL XHPROF FOR PROFILING PHP YII 1.X APPLICATION